One of the nice things about sitting for a long time is that I can take the time to perform some of the annual maintenance that most RVs require. First on our list was for us to do our annual hot water heater maintenance. This task isn’t really all that difficult and just about anyone with minimal handyman/woman skills can tackle this chore. I hope to provide an easy guide to help others, who like me enjoy doing their own maintenance.
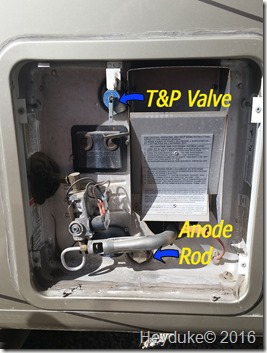
There are only a few tools required a few replacement parts. Our motorhome has a Suburban 10 gallon Hot Water Heater and thus has an anode rod. Those with Atwood Hot Water Heaters do not have an anode rod but still would be advised to flush out the sediments and deposits that build up over time in the tank. An anode rod is designed to serve as a sacrificial part and is  typically composed of magnesium. It protects the hot water tank by attracting corrosive elements to itself thereby sparing the rest of the hot water heater. So instead of the tank corroding away the anode will.
Our motorhome has a Suburban SW10DE Hot Water heater installed in it so I ordered the 232767 anode rod which is made of Magnesium. The 232768 anode rod is made of Aluminum. I prefer the Magnesium as it is a better attracts the bad elements. However, if I ever find myself replacing them too often the Aluminum one typically will last longer.
After determining which model hot water heater you have then make sure to order the correct anode rod for your RV. Your particular model may require a different anode rod which can likely be found here. It is also a good idea to purchase some Teflon tape if you don’t have any on hand. Next is to make sure you have the necessary tools to do the job.
Tools Required and Replacement Parts
- Anode Rod Part (make sure to oder the correct one)
- 1 Inch Socket with Ratchet and short extension (some use 1 1/8 or 1 1/4” socket)
- Tank Flushing Wand
- Teflon Plumbing Tape
The night before replacing the anode rod, turn off the hot water heater. The next day simply turn of your water and then you are ready to begin the chore. Before pulling out the old anode rod you will need to drain the hot water heater. My RV has a valve in the wet bay to drain the hot water however you can also run the hot water only in the shower until it trickles.
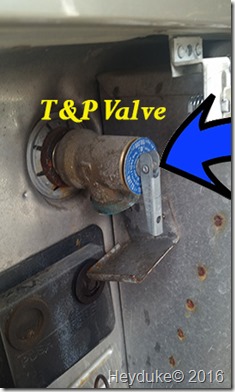
Next you need to release the pressure by pulling of the lever on the T&P valve (Temperature and Pressure Valve). Pulling the silver handle will release the pressure (do not do this if your hot water is still hot as you may burn yourself). Pulling the silver handle will equalize the pressure in the tank. It might hiss and spray a bit of water but don’t be alarmed as that is normal. Now it is safe to pull out the old anode rod.
The anode rod in our Suburban SW10DE required a 1” socket to remove it. If you don’t have the right size socket they can be purchased individually at most hardware stores. Buy one and then you will always have it on hand for this annual maintenance. I use a small extension to make it easier to remove the old rod.
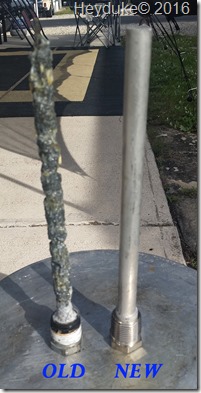
You can place a plastic bucket below the anode rod to catch the cloudy water in. Depending on how much water remains in your heater be careful when taking out the old one as the water will come out pretty fast if there is still a lot in it. Also the water will be very cloudy and filled with lime scales and other particulates. Once you have removed the old anode rod inspect it and if it is mostly eaten away it should be replaced. If not save your new replacement for another day.
Now that the old anode rod is removed and the tank is empty you need to flush out the tank. There is a nifty little plastic flushing tool that hooks up to your water hose. Insert this flushing wand in the anode rod hole and it can reach way back into the tank. Hold the curved in down at first and turn the water on to flush out all the remaining debris inside the tank. Keep flushing until you no longer see any calcified deposits or sediment come out.
Before installing the new anode rod, or putting in the old one if it is still good, wrap some white Teflon plumbing tape around the threads and then you can screw it in and tighten it snugly. Now turn on your RV water and the Hot Water tank will refill. As it fills you can pull the T&P valve to let some air escape. Next go inside and turn on your hot water taps and let them run until they stop making gurgling noises. When the water runs noise free you have removed all the air from the plumbing lines and you can now turn back on your hot water heater.
After 20 minutes or so the water should begin to heat and when you turn on a hot water tap you should notice that all is working well again. After the first time I am sure you will be able to do this is no time at all…


Just so your readers know, in the photo you show of old vs new, the "old" one still has quite a lot of life left to it.
ReplyDeletewww.travelwithkevinandruth.com
Some, yes... but not a lot...
DeleteIt is an easy job, We have an atwood water heater no anode rod is needed, because the tank in aluminum. 16 years old and I just drain and flush once a year.
ReplyDeleteI went to flush ours out with the nifty flushing rod. The end of mine was metal. Somehow the plastic that held it in place cracked and the force of the water shot it into the tank. It took a nurse nearby that had hemostats to retrieve the rod.
ReplyDeleteYeah, definitely doing your own maintenance is a good thing as it teaches you whole lot of things besides saving you some cash. Nevertheless, it is always good to know what fits within a DIY context and what you can handle. The best thing about this blog, I loved the details and definitely one that can be looked at when doing such maintenance.
ReplyDeleteLevi Eslinger @ Capital Plumbing