I have been busy sanding the back of the RV. It has taken countless hours of sanding to remove all the paint but I have made great progress.I began sanding with 80 grit sandpaper to remove the clear coat which was damaged while knowing I had to really get down to the surface of the paint.As I was sanding through the clear coat I switched over to 180 grit to reduce my aggressiveness and to smooth the 80 grit scratches. Once I got down to the old paint I decided it was probably best to remove the paint as well and sand to the the fiberglass
To do that I continued with the 180 grit until I began to see the primer and then I switched to 240 Grit once again moving to a finer grit to smooth the scratches of the 180 grit sandpaper.
Once the primer was wearing through the last grit I chose to use was 320 grit. Once finished with this paper I will have a very smooth surface for application of the first few layers of epoxy primer.
That is where I'm at at this point in time I sanded for hours and hours resulting in a surface as "smooth as a baby's butt" (well maybe not that smooth).Now I am focusing on caulk removal and finishing sanding all the hard to get to spots.
The next step will be to prepare a paint shelter that will protect me from the elements when I start the painting process of the epoxy primer. I will be using an epoxy primer from southern polyurethanes based upon recommendations from a forum I joined.
My paint shelter will be constructed out of 3/4 in. PVC pipe and thin plastic sheeting that is transparent to let the light in. It will be constructed so that it will cover the entire end cap. This will provide me a protected space from the elements such as dust, debris and bugs thus protecting my fresh paint.
So now it's a waiting game and time to buy my final products to get the job done. My plan is to start painting sometime around the 6 or 7th of October!

Wednesday, September 27, 2023
More Sanding on the Endcap


Sunday, August 20, 2023
Converting our fluorescent overhead lights to LED using LED light strips.

Well, we finally ran out oft-8 fluorescent bulbs for our overhead lights. That meant it was time to finally convert all of our fluorescent bulb overhead lights to LED. Instead of buying new lights or buying expensive replacement LED bulbs I chose the more frugal way and used LED strip lights.
I purchased some LED strip lights from TEMU, specifically the Bright Cold White LED Strip Light, SMD2835 12V strips. These have 120 LEDs per meter. I also bought a Light Strip DIY Connector Set (8mm) so I wouldn’t have to do any soldering. These connectors were for 2 Pin 8mm 3528/2835 LED Strip Light.
The strip lights cost 3.89 per roll; I bought two rolls. The connector set was 4.89. My total investment so far is less than 15 dollars. I found that one roll and one pack of connectors will do 5 overhead lights where I used two strips (18 inches) for each light. So if you buy the LED strip and a connector kit from TEMU your cost per light conversion will be about $1.75 per light!
This light has white LED's that are equivalent to "daylight" fluorescent tubes, ( ~6500K temp). If you like “warm white" which is more like an incandescent-like (about 4000K). We like brighter lights.
So how did I do this? Here you go…
1. Remove the light cover and then you can see and remove the four screws which hold the light fixture in place. Make sure to take out the bulbs before removing the screws.
2. After removing the four screws the light can be taken off of the ceiling by cutting the 12V wires that are attached to the light fixture. Disconnect the battery if you are concerned or just turn off the lights you are removing.
3. Remove the ballast cover by drilling out the rivets (from the back side of the light fixture). Now you only need the two wires coming from the switch and save the longest white wire by cutting off of the ballast. This will allow you to keep the light rocker switch intact.
4. I chose to remove the ballast and the white ends which hold the bulbs in the fixture. These have 2 small phillips crews on each end. Once these are removed you can take out the light bulb holders and toss them.
5.Now cut the LED strips to desired length and put one of the strip connectors on the LED strip - MAKE SURE TO OBSERVE POLARITY (there is a (-) printed on the LED strip). It’s a good idea to test each strip with12V to make sure they work.
6. I mounted 2 LED strips in each light and this gave as more light than the 2 original bulbs. Each strip has an adhesive so peel off the tape and stick them to the cleaned surface of the light fixture (you did clean it first,didn’t you). I also used a small piece of double sided tape to hold the connecter where the wired end meets the light strip for a firmer hold.
7. Then I wired the strips all together (positives together, and grounds together).
While I only did five lights I still have three more to do but that will be another day.
Thursday, November 25, 2021
Building a Cabinet Door for our new Fridge Cabinet

I left the refrigerator project on hold when we left Mesa AZ because to finish it off I needed to find a cabinet door. I looked online and found that a narrow door in the same wood type as our rig, alder, was going to quite a challenge.

I did find a site which would build a cabinet nearly to my needs, but it would have to be 1/2 wider than I desired. After remeasuring everything and taking into account that the door had to open to the right meaning the hinges had to be set in a particular spot to allow for the clearance of the door opening in toward another cabinet I figured I could make it work.

I kind of gave up on the project and thought I would reinvestigate it later. Well that day finally came because here at Far Horizons RV Resort I discovered the park has a wood shop. Since there were no fees associated with using it I decided that maybe I could build my own cabinet door.

Scouring You Tube videos trying to find a solution on how to build a cabinet door with minimal tools I finally came upon one that was perfect for what I needed. A You Tube video titled Build Shaker Cabinet Doors With Table Saw | New to Woodworking.

After watching the video a few times I knew this would work for our needs. And as luck would have it the local lumber center had alder wood and the same hinges we have in our RV. I bought a couple of pieces of 1x2’s and some hinges then I was off to the wood shop.

First I used a radial arm saw to cut the pieces to size for the cabinet door frame. Then I used a table saw to cut the groove on the edge of the frame pieces that I could later insert a 1/8’ piece of plywood that I had leftover from tearing out the old Norcold fridge.

Next was a tricky part to make the stub and groove tenon joints as can be seen in the above photo. These joints make the cabinet door stable and study to allow for the abuse of constant opening and closing that cabinets endure.The video showed me how to do this using only a table saw.

Measuring was critical and I lucked out as I was able to do so by only messing up one small piece. Once all the cuts were made I cut the 1/8” plywood cabinet face to fit inside the groves of the frame pieces. I dry fitted all the pieces together and once satisfied that all the pieces fit I glued it all together using wood frame clamps to hold it tight to dry overnight.

The next day I took off the clamps and gave all the pieces a light sanding including rounding the edges. Next I used a cherry stain I had previously purchased based upon Tiffin’s recommendation as one that would match our cabinetry the best.
Sharon and I couldn’t be more pleased at how the cabinet door turned out. After we installed the hinges and a door catch we now have a new storage area that looks as if it was always there and all built for less than $35.
NOTE: We are currently in Tucson AZ until December 1st…
Thursday, January 31, 2019
Replacing Our RV Front Shocks (DIY)
With our extended winter stay I have had time to not only fix all the little things on the RV and our CRV but I also to tackle some bigger jobs . One such job I wanted to do was to replace the shocks on the front end of our Tiffin Allegro Bay.
After reading online about how to best do this I was surprised at how easy this job would be. The only real challenge it seemed would be to loosen the nuts initially off of the bolts holding the shocks to the chassis. In addition my next challenge was to determine which shocks to order.


After reading many reviews and accounts of other RV’ers I came to the conclusion that I would replace the front shocks with Koni shocks. These shocks come very highly rated by others and I read many accounts of happy campers for those who went with the Konis as their replacement shocks.


Most accounts I read said to make sure to order shocks specific to your chassis and year model. I contacted shock warehouse via a chat session to determine what I needed. After telling them my year model and chassis of our RV they told me what to order. The shocks came in about 5 days later and during that time I had sprayed Liquid Wrench on each of the shock nuts and bolts hoping to make them easier to remove.


The bolts and nuts needed 1 1/8” sockets (1/2” drive). The other tools I needed were a large 12 “ adjustable crescent wrench , an 18” 1/2” drive breaker bar, a propane torch with a quick start and a piece of pipe to extend the breaker bar’s length. With tools in had I tried to remove the nuts off the bolts. After using the pipe to extend the breaker bars length and bit of heave and ho the two bottom nuts came off.


The top bolts were much harder to loosen. One finally broke free using the full length of the pipe and breaker bar but the other one required the use of the propane torch to heat the nut hoping to cause it to expand and break free from whatever was causing it to seize up. Well after a bit of cussing and grunting it also finally broke free.
With the shocks out I opened the new ones only to discover the holes in the top of the shocks were too small to accept the wider bolts that came out of the old shocks. CRAP, I have the wrong shocks!!! So after contacting shock warehouse and going back and forth with them they finally agreed to pay the shipping for me to return the new ones and get the correct ones sent back to me.

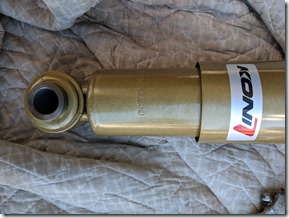
The problem with the initial order was I have a FRED which is a front engine diesel chassis in our RV and they required a different shock. The company tried to assign blame to me saying I ordered the wrong ones but after showing them my saved chat session they realized that maybe they should have asked me if I had a FRED chassis. Anyhow it took a while to get the new shocks but eventually the right ones were sent to us without me having to pay additional shipping.
Installing the shocks was easy and straight forward as I simply reversed the steps on how I took the old ones out. Now I should mention that I had my jacks down already as we have been parked and set up on our site. As a result I didn’t have to raise the rig to remove the shocks . The shocks have no weight bearing on them so they really are simple to remove once the nuts are freed.


The only trick in putting on the new ones is to put the top bolts on first so you can pull (albeit not easily) the lower half of the shock down so the hole lines up up with the chassis hole for the lower bolts.
Anyone can do this job and other than some awkward arm positions the task takes less than an hour to remove and replace your shocks. With this behind me I will rest awhile before I move on to another big one as our water heater just went out…..sigh.
NOTE: We are still at our winter site until March 1st in Bonita Springs, Florida…
Thursday, January 10, 2019
Step Repair and a Small Modification…

One of the best things about having an extended stay this winter is it gives us time to fix some things that we have been ignoring as well as take care of some larger repairs. The most pressing large repair was that we needed to fix our steps. You may remember I penned a blog about replacing the step motor in California. Last year I rebuilt the steps by changing out all the loose bolts.


Well now our problem was the steps had broken. One of the steel slats on the outside edge of the top step cracked and resulted in our steps becoming very bouncy, and I mean VERY BOUNCY. This much needed repair required me to remove the steps first by disconnecting the cables/wires to the motor and ground, then next by removing the four bolts which hold the steps to the RV. Sounds easy right? Well, not so fast, as it was really hard to get to two of these bolts which required me to blindly explore to find the nut on the top of the steps to remove them.
Anyhow, once the stairs were off I took them over to a welding shop to have the crack repaired. The welder not only repaired the crack but added a side brace to strengthen the area around it. He also recommended I do the same bracing on the other side to prevent the same crack occurring on that side. Forty dollars later (a very fair price I thought) I spent the next two hours trying to get that one nearly impossible bolt back on the steps. I am not sure I would have ever gotten it on if I hadn’t basically taped the nut head to the crescent wrench to get the bolt started.


Another minor upgrade I needed to make was to add a fan on the cabinet wall in between the TV and our stereo receiver. This became necessary as our TV had been sometimes overheated and recently our stereo receiver posted a “Thermal Error” which shut it down due to excessive heat.
I bought a nifty fan on Amazon which is powered via USB cable. By plugging it into either the TV or the stereo receiver the fan will come on anytime the unit is turned on allowing for air movement around the device to keep it cooler. But first I had to cut a hole in the 5/8” wall where I wanted to place the fan. I cut the hole by initially using a power drill to drill holes on each corner of the square I planned to cut out. Next I used a jig saw with a wood blade and slowly cut out the square.
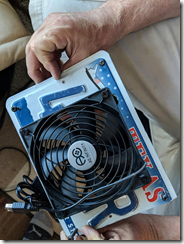

This, of course, made quite a mess so all the sawdust had to be cleaned up before continuing. Since I didn’t want to attached the fan to the wood as it would not provided efficient airflow I cut the hole larger than the fan. I then had to get creative by using one of our old license plates from the RV to make a plate upon which to attach the fan on so I could then secure the plate to the wall. I cut the hole in the license plate the same way I cut the the one in the wall but used a metal cutting blade in the jig saw. If I do say so myself it was a perfect solution as the fan is in and doing its job.
With those items repaired I took two things off of our TO DO list for our winter stay. Don’t worry about us being bored here as the TO DO list has plenty more on it…
NOTE: We are now at our winter site for the season in Bonita Springs, Florida…
Saturday, April 21, 2018
Replacing our RV Carpet–Part Two…

Continuing the blog about our carpet installation, pulling up the carpet in the cockpit area was tedious since there were more cuts and thus more staples. With patience I eventually freed the old carpet. Interestingly there was only a little carpet padding as most of the area had a large rubber mat which I assume was designed to decrease engine noise and insulate from engine heat. For the cockpit area we chose a lower piled carpet and as I pulled the old carpet out I those pieces as a template to cut the new carpet. Another 100 stales into the floor and the cockpit was nearly done.
I said nearly since there is a hatch in our cockpit for access to our front engine diesel. This is also carpeted and removing the old carpet was a bit harder since this piece had been not only stapled but glued on using Weldwood contact cement. Using a pair of pliers I slowly pulled on an edge of carpet using the carpet knife to cut the glue away. It took a while but it was done. I also used contact adhesive to glue on the new carpet adding only staples all along the edges. Viola – Cockpit done!


Next up was the steps in the entrance area. The sides are where the carpet was and man oh man were they stapled in and glued as well… After pulling out seemingly endless staples I was able to use the pliers and carpet knife to remove the old carpet. Using the old carpet as a template, new pieces of carpet were cut and glued in place. A few additional staples and the step area was done.
All that was left was the large living room/dining room slide. Since it was on a slide the old carpet was fairly easy to remove. No glue and only staples were used so I was able to manhandle off the floor. There was no carpet padding under the slide and I didn’t add any either. Again using the old carpet as a template I cut the slide out carpet which was the lusher, higher piled carpet we also used in the bedroom.


Once it was cut we took it over to Carpet Handlers in Bryan Texas to have the edge of it bound. They charged $3 per running foot to bind it and it took about 4 days to get it back. It needed to be bound as the edge must hang off over the slide to cover up the slide gap. If it wasn’t bound it would have continued to fray and shed carpet fibers.
Final installation of this slide carpet was a snap. I did forget to mention in the removal of the old carpet I also had to take out the sofa which was held down by four bolts. It was easy to remove. Then there were four bolts holding down the seat belts for the sofa which were also easy to remove. I made sure to label where each seat belt went to make it easier to put them back in their rightful spot.


With the new slide carpet bound all I needed to do was measure and mark the place where all the bolts would come through the carpet and cut little slits so they would come through it. With them in place I stapled along the edges near the bolts so I could locate where the couch bolts would go through the carpet. I marked the spots with scotch tape so I could align the couch properly. Placing the couch near the tape and using an ice pick to locate the holes which hold the couch in place I was able to sink the screws into the floor. With the seat belts and couch back to where they belonged I continued stapling the carpet as I used the knee kicker to keep it stretched.
To finish the job I needed to use a coping saw to remove 1/4 of an inch of the trim that the bound carpet would slide under since the new carpet was a bit thicker. With the trim cut I finished the stapling and put everything back in its place.
Now that all of our flooring has been replaced the RV is ready for many more years of travel on the Road of Retirement…
NOTE: We are still in College Station, Texas for the month of April…
Saturday, April 14, 2018
Replacing our RV Carpet–Part One

We are still in College Station ticking items off of our to-do list. One item was to take care of my medical appointments and since I am a veteran that meant a few trips over to the VA hospital in Temple Texas. I had a colonoscopy done and went through the normal (and disgusting) protocol necessary for the doctors to have their clear view :) Thankfully I was given a clean bill of health and will not have to do another one for five years.


With that behind me (no pun intended) I can focus on a larger chore which is the removal of our remaining original carpet and replacing it with new carpet. Last spring we began the process of reducing the amount of carpet in our main living space by converting to a Coretech Luxury Vinyl Tile. The plan is to replace the doghouse carpet, the bedroom and the small area on our slide out. Even though there is not much carpet to replace I have discovered that the prep work has been the worst part. Let's just say I learned to really hate staples


When removing the existing carpet from the RV there are a few tricks. One thing to know is that when most RV’s are built they already have the carpet laid on the floors before adding any of the cabinets or furniture. That means you either have to remove all the cabinetry or use a carpet cutter to cut around the base of the cabinet to remove the carpet. The other trick is to use pliers to pull the old carpet from the floor freeing it from the staples. Otherwise using bare hands could result in puncture wounds from the many staples.


Once the old carpet was out I had to remove the old carpet pad. It is important not to scrimp on padding as the cushion feel of carpet is mostly due to this pad so upgrading the existing pad can make quite a difference!.. We were lucky in that we did not have to buy any padding since Dan and Merlene (our RV buddies at Betty’s RV Park) had enough left over from their recent carpet replacement. I cut and stapled down the new padding and after cleaning everything up I was ready to cut the new carpet.


We found our carpet in two different locations. We were looking for good durable carpet but didn’t plan to buy super high end carpet for the RV. We focused on having a 10 year warrantied carpet which was durable and fade resistant. We ended up with a Shaw polyester for the bedroom and slide which we purchased for the way low price of 99 cents per square foot at a Surplus Warehouse in Bryan. Then we bought a lower piled carpet remnant to redo the front cockpit flooring for 30 bucks.

I will discuss more in the next blog about the rest of our carpet placement and the process of "pimping our ride". It has been arduous and time consuming but we see light at the end of the tunnel......
NOTE: We are still in College Station, Texas for the month of April…
Saturday, February 10, 2018
Replacing Our Day/Night Shades–a DIY Project…

With our RV now 10 years and going on 11 we decided that this year would be the year we would upgrade our RV. We don’t see going off the road anytime soon and we see no reason to purchase a new motorhome so the only logical choice was to (as Sharon would say) Pimp our Ride!


Last spring we replaced the flooring and got rid of much of the carpet. We still have some carpet left and we will replace the areas remaining with new carpet. Earlier this month I replaced all of our slide toppers because after 10 years of wear and tear it was time for them to be trashed and replaced. Next up for us was replacing our horrid day/night shades.


After reading tons of reviews about replacement products I kept reading rave reviews for the MCD shades. After pricing them out however I decided I had better dig deeper to see what other options were out there. Spending over $2000 for window treatments was simply way over our budget! We did discover there is a small shop out of Red Bay Alabama who also does a roller day/night shade and at first we considered it because it was 1/3 less in cost. However, they explained the cornices would all have to be modified to add about 1” in depth. As a result it would be just as costly as MCD shades and we really did not want to add more width to our cornices so we rejected this option.. Was there no other alternative?


I came across a website called Selectblinds. After reading all the product information and reviews I found a couple of honeycomb shades that seemed perfect for us at over half the cost. I chatted with an agent online and finally decided to order them. Eight replacement shades at about $100 per shade on average made it affordable.


I ordered two types of shades. The first a classic day/night shade. Yes these still have strings in them but at no angles thus leaving less chance of breaking. They fit perfectly in our valances so there would be no additional modifications. The second shade I ordered was a top/down bottom/up blackout shade which had a special feature in that you could open the shades from either the bottom or from the top down. We have some extra tall windows so being able to open them from the top we could have some sky views from windows we otherwise rarely used – Sweet!!!
Installation was simple and straightforward (after I figured out how the attachment clips worked). The steps I performed are below:
- Remove cornices by removing screws from the side braces and then those in the top or sides of the cornices. This is where an extension Phillips will be a godsend.
- Remove old blinds by removing the screws from the string attachments and then pressing the attachment clip releases to free the old shades from the cornice. This is an excellent time to thoroughly clean the windows and the window screens, which we did.
- Next I needed to remove the old attachment clips and install the new ones. These ere type “C” attachment clips and the installation guide had very poor picture of how to install them. It took me the better part of an hour to solve the riddle of how to install them so I have included pictures of how they are installed.
- Now all I needed to do was align the new blinds equidistance from the sides of the cornice and snap them in place. Also I added the two plastic window lift tabs onto the new blinds and they were ready to reinstall.
- Before installing the blinds I had to replace the screws along the right and left side of the window to reduce the height of the screw head. Why? Because the blinds were hitting the larger screw head but not the smaller one when I replaced them.
- Lastly I had to re-install the cornices the opposite way I took them off. An extra hand here helps immensely with this step. One trick here I used was to tape the screw on the extension so it wouldn’t fall off before I could get it started back in!


I was easily able to install all eight blinds in an afternoon but I was a bit sore from having to contort myself in ways to be able to remove some of the screws from the valances. The only special tool needed here was a drill extension and long bit with a Philips head on it. The tool is pictured below for your convenience.


So now we are enjoying our new blinds and only time will tell if these blinds are the perfect blinds for us and our RV…
NOTE: We are now in our winter home until March 1st in Bonita Springs Florida at Imperial Bonita Estates RV park and Coop.